Privacy code scanning with Privado
Many privacy tools focus on how and where personal data is being stored, rather than how it’s processed. For example, Fides integrates with many common data sources to help you manage your data inventory and generate data maps. While these tools are essential in mapping out the data flows across your organization, few of them focus on the code itself—where the actual processing happens.
Because at the end of the day, the code is what decides what happens to the data, and ultimately how it’s being shared. Deploying a code change may inadvertently cause sensitive data to be shared with your analytics provider or other partners. How can you prevent privacy incidents before they happen?
In this tutorial, you’ll learn about privacy code scanning using Privado—a tool built specifically for finding privacy issues in your code. You’ll use a sample application that lets you explore each concept as you go.
By the end of the tutorial, you’ll be able to scan a Java repository with Privado, as well as interpret the results from the scan.
Note: I’m not in any way affiliated with Privado. Though they were kind enough to help me generate the screenshots for this tutorial (thank you! 🙏).
Before you start
To finish this tutorial, you’ll need:
What is privacy code scanning?
Many companies rely on periodic reviews or audits to discover privacy issues—at which point a substantial amount of sensitive data may already have left your company. By introducing privacy code scanning to your workflows, you can dramatically increase your chances of preventing a privacy incident.
You may already be familiar with static analysis tools like PMD, Checkstyle, or SonarQube, that find bugs, code smells, or performance problems in your codebase. Similarly, a privacy code scanner statically analyzes your code to uncover potential privacy issues—before it’s in production.
While you can run a code scan on your local computer, privacy code scanning works best when it’s incorporated as part of your continuous integration workflows. Privacy issues should break the build, so that they must be addressed before a feature can be released.
Install the Privado code scanner
Privado is an open-source privacy code scanner that discovers data flows in your code. It does this without having to modify the code itself, making it easy to add to your existing codebase and workflows.
At the time of writing, Privado supports Java, Go, Python, Ruby, PHP, and C#/.NET.
To install the Privado CLI, run the following installation script in your terminal.
curl -o- https://raw.githubusercontent.com/Privado-Inc/privado-cli/main/install.sh | bashYou can check that the installation was successful by running privado version in your terminal.
The installation script creates a .privado directory in your home directory. Depending on your environment, you may need to add it to your PATH:
export PATH=$PATH:"$HOME/.privado/bin"Set up the sample application
In this step, you’ll download and scan the sample application that you’ll use throughout the tutorial.
The sample application uses Spring Boot to expose a REST API that lets you register and query users, and Spring Data JPA to store them in a PostgreSQL database.
main branch being the finished source code. For each step, you can choose to add the code yourself, or you can check out the corresponding branch, if you just want to follow along.Clone the privado-sample-app repository:
git clone https://github.com/marcusolsson/privado-sample-appSwitch to the
start-herebranch.git checkout start-hereScan the sample app using the
privado scancommand:cd privado-sample-app privado scan .The Privado CLI runs the official Docker image behind the scenes. When you run the command, you’ll see that it starts downloading Docker images. This may take a few minutes depending on your internet connection.
The command asks you whether you want to visualize the results on Privado.ai. If you’re a Privado customer, you may want to check it out. Otherwise, type
nand press Enter.
Once the scan has completed, you can find the results in .privado/privado.json inside the scanned directory. Feel free to open the file in your editor to get a feeling of what’s there. But don’t worry—we’ll explore it together once we start adding some personal data.
Privado concepts: Data flows
During a scan, Privado attempts to identify sensitive information, or data elements, in the code. It then follows each data element throughout the various execution paths, and makes note of all their destinations. The result is a collection of data flows—graphs that describe how data moves through the code.
Over the next couple of sections, we’ll gradually introduce data flows to a service that processes patient data for a healthcare organization.
Privado concepts: Sources
Sources are the variables, classes, and other structures in your code which represent sensitive data. By discovering sources, we’ll be able to create a comprehensive list of any data elements being processed by the application.
In this step, you’ll add a Patient class with fields representing Social Security Number (SSN), phone number, and date of birth. Then, you’ll use Privado to discover these attributes.
To jump to the finished code for this step, run the following command:
git checkout sourcesCreate a new file called
Patient.java:src/main/.../privadosampleapp/Patient.java package dev.marcusolsson.privadosampleapp; import java.time.LocalDate; import jakarta.persistence.Entity; import jakarta.persistence.GeneratedValue; import jakarta.persistence.GenerationType; import jakarta.persistence.Id; @Entity public class Patient { @Id @GeneratedValue(strategy = GenerationType.AUTO) private Long id; private String ssn; private String phoneNumber; private LocalDate dateOfBirth; public Patient() { } public Long getId() { return id; } public void setId(Long id) { this.id = id; } public String getSsn() { return ssn; } public void setSsn(String ssn) { this.ssn = ssn; } public String getPhoneNumber() { return phoneNumber; } public void setPhoneNumber(String phoneNumber) { this.phoneNumber = phoneNumber; } public LocalDate getDateOfBirth() { return dateOfBirth; } public void setDateOfBirth(LocalDate dateOfBirth) { this.dateOfBirth = dateOfBirth; } }Run the scan again. To avoid the prompts, this time we’ll add flags to overwrite the results from the previous scan and to skip uploading the results to Privado.ai.
privado scan privado-sample-app --overwrite --skip-uploadIn the terminal output, you can already see that it detected the new attributes:
3 DATA ELEMENTS
Here is a list of data elements discovered in the code along with details on data flows to third parties, databases and leakages to logs.

1. FIRST NAME
        Processing      ->  1

2. PHONE NUMBER
        Processing      ->  1

3. DATE OF BIRTH
        Processing      ->  1
Open .privado/privado.json in your editor. Let’s focus on two properties for now: sources and processing.
The sources property lists the different kinds of personal data that are being processed by the app.
{
  "sourceType": "Data Element",
  "id": "Data.Sensitive.NationalIdentificationNumbers.SocialSecurityNumber",
  "name": "Social Security Number",
  "category": "National Identification Numbers",
  "sensitivity": "high",
  "isSensitive": false,
  "tags": {
    "law": "GDPR"
  }
}
If sources tells you what data is being processed, then processing tells you where it’s being processed.
{
  "sourceId": "Data.Sensitive.NationalIdentificationNumbers.SocialSecurityNumber",
  "occurrences": [
    {
      "sample": "java.lang.String ssn",
      "lineNumber": 6,
      "columnNumber": 20,
      "fileName": "src/main/java/dev/marcusolsson/privadosampleapp/User.java",
      "excerpt": "package dev.marcusolsson.privadosampleapp;\n\nimport java.time.LocalDate;\n\npublic class User {\n    private String ssn; /* <===  */ \n    private String phoneNumber;\n    private LocalDate dateOfBirth;\n\n    public User(String ssn, String phoneNumber, LocalDate dateOfBirth) {\n        this.ssn = ssn;",
      "arguments": null
    }
  ]
}Try adding other fields to the Patient class, or different variations of field names—such as email, primaryEmail, or emailContact.
What limitations do you think a tool like this would have? For example, would the scan detect the source even if it had a typo, like primaryEmal?
Privado concepts: Sinks
Sinks are the destinations to where personal data is being sent—for example databases, logs, and other APIs. Sinks give us important insights in how our sources are stored and potentially shared with other partners or vendors.
Privado supports multiple types of sinks:
- Storage
- Leakage
- Third party
- Internal API
In this tutorial, we’ll focus on storage and leakage sinks, but you can read more about Third Parties and Internal APIs in the official docs.
Storage sinks
Storage sinks are your databases, file systems, and other places where data is being persisted—for example PostgreSQL, MongoDB, or S3.
In this step, you’ll implement the code needed to register a patient through an API endpoint, and save it to a PostgreSQL database.
To jump to the finished code for this step, run the following command:
git checkout storageAdd a new file called
PatientRepository.javawith the following code:src/main/.../privadosampleapp/PatientRepository.java package dev.marcusolsson.privadosampleapp; import org.springframework.data.jpa.repository.JpaRepository; public interface PatientRepository extends JpaRepository<Patient, Long> { }Add a new file called
PatientController.javawith the following code:src/main/.../privadosampleapp/PatientController.java package dev.marcusolsson.privadosampleapp; import java.util.List; import org.springframework.web.bind.annotation.GetMapping; import org.springframework.web.bind.annotation.PostMapping; import org.springframework.web.bind.annotation.RestController; @RestController class PatientController { private final PatientRepository repository; PatientController(PatientRepository repository) { this.repository = repository; } @GetMapping("/patients") List<Patient> all() { return repository.findAll(); } @PostMapping("/patients") void register(Patient patient) { repository.save(patient); } }Run the scan again. You’ll see the following in the terminal output:
2 SINKS
Here is a list of sinks discovered in the code.

1. JPA REPOSITORY(READ)

2. JPA REPOSITORY(WRITE)
By adding the repository and the controller, we’ve created a data flow through the application. Patient data is collected through a REST API, and stored in the database. The code scan was able to discover the flow of data, without you having to explicitly tell the scanner about it. This is a rather simple application, but imagine a much larger monolithic application with multiple repositories, endpoints, handling different sensitive attributes.
Note that if you tried running the scan after adding the repository class, but before adding the controller, you’d notice that the scan didn’t list any sinks. That’s because even though PatientRepository defines the operation to store patients, no patient data actually flows to the database yet. Neat!
Leakage sinks
Sensitive data should always be encrypted at rest. If your application writes personal data in plain text, you may be exposing your users to privacy risk. Privado is able to detect leakages—sinks where sources are stored in plain text.
One of the most common leakages, is when personal data is written to logs. In this step, you’ll attempt to log a patient’s social security number, and see if Privado catches it.
To jump to the finished code for this step, run the following command:
git checkout leakagesDefine a logger in the
PatientControllerclass.@RestController class PatientController { private static final Logger logger = LoggerFactory.getLogger(PatientController.class); // ... }Add a statement that prints the patient’s SSN to the log output. (Let us hope this is the only time you’ll ever do this 😱)
@PostMapping("/patient")
void register(Patient patient) {
    repository.save(patient);

    logger.info("Registered new patient with SSN: {}", patient.getSsn());
}
Run another scan.
In the terminal output, you’ll see that Privado indeed caught the leakage:
1. SOCIAL SECURITY NUMBER
        Storage         ->  POSTGRESQL ? postgres ? WRITE
        Leakage         ->  1
        Collections     ->  /patients
        Processing      ->  2
Next steps: Privado Cloud Dashboard
So far, you’ve seen how you can use the open-source version of the Privado code scanner to discover how data elements flow through your codebase. However, the real power comes when you sync the scan results to the Privado Cloud Dashboard.
For starters, rather than parsing the privado.json file yourself, you can analyze the scan results in an intuitive user interface.
You’ll be able to visualize the data flows for each data element as it’s being processed throughout your application.
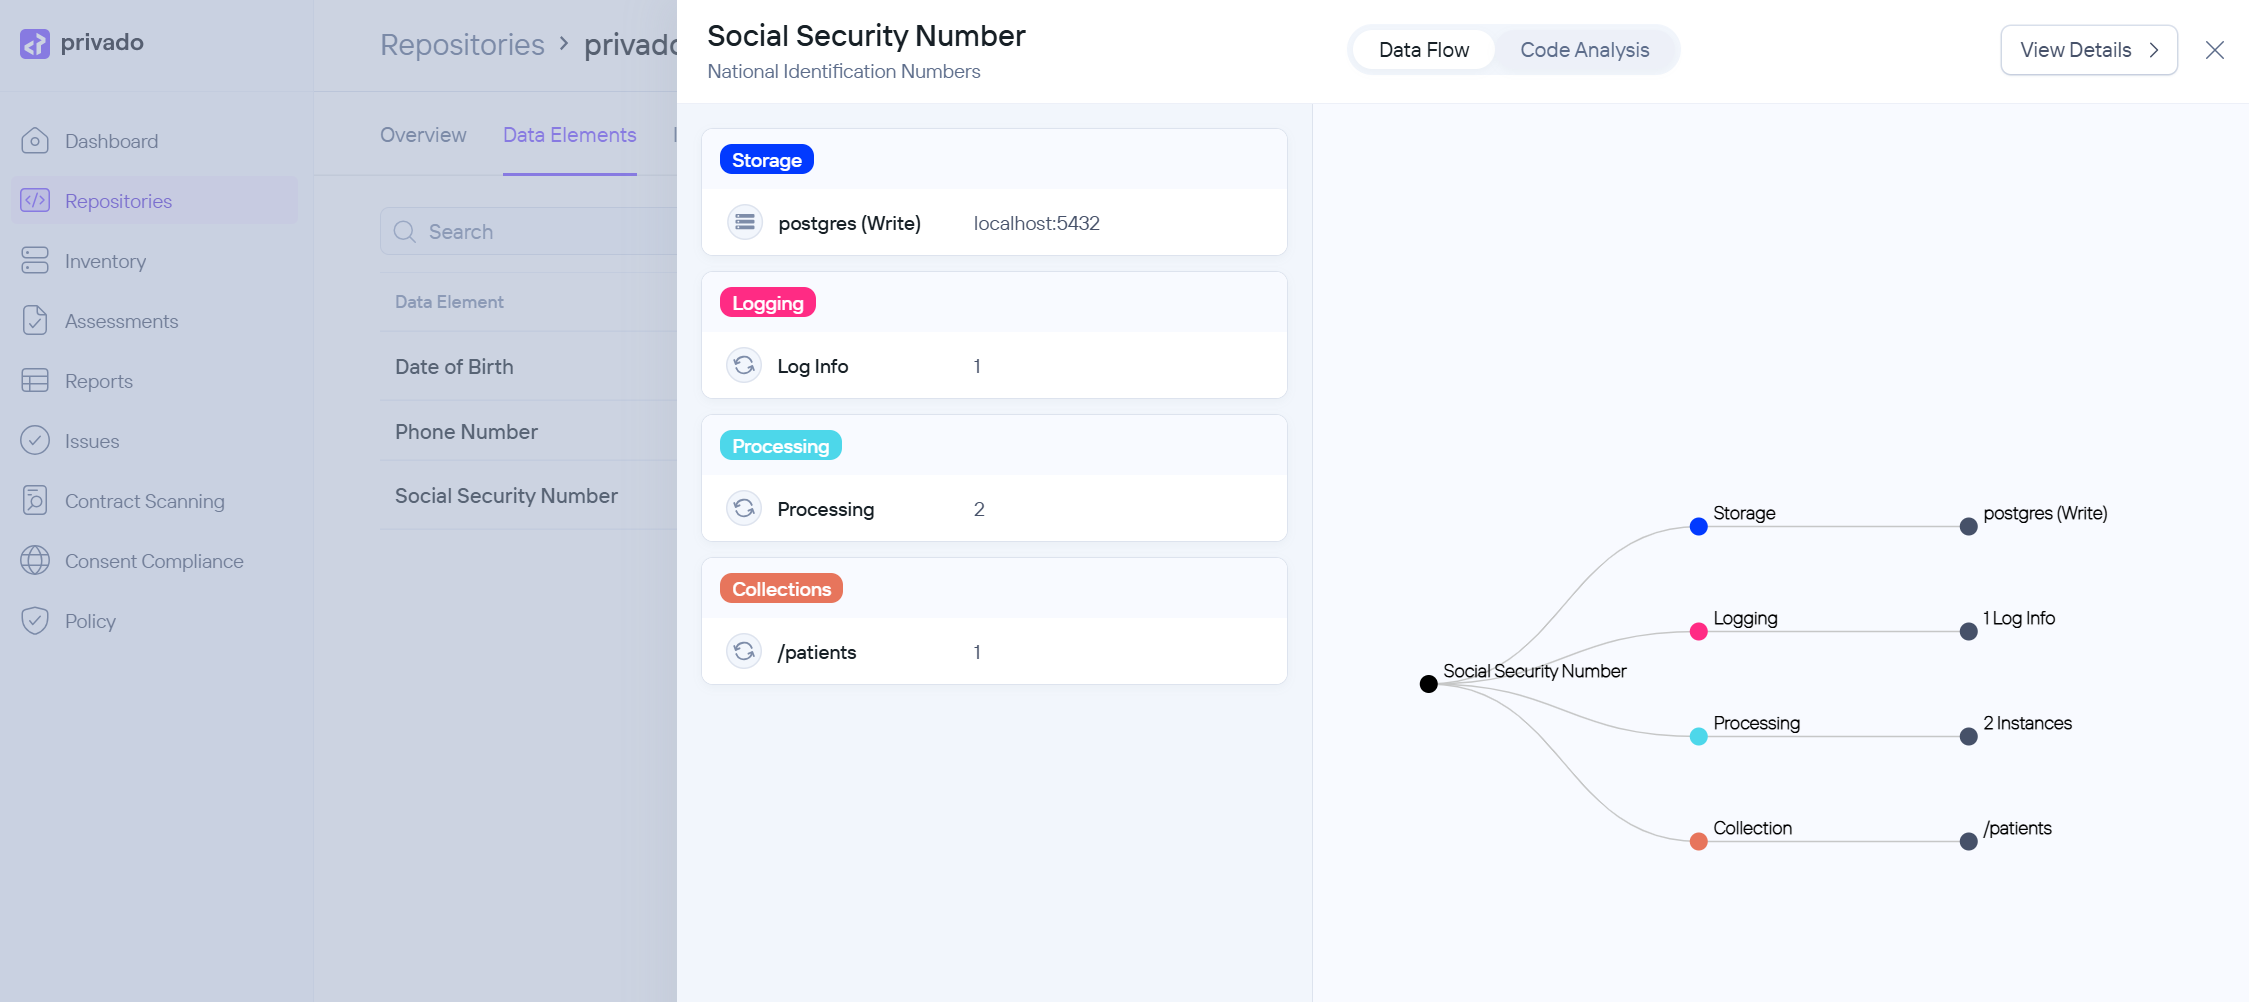
Also, while the open-source version of Privado relies on regular expressions to find sources based on their context, the paid version uses AI to discover data elements more precisely.
Rather than attempting to explain all the features offered through their platform, I recommend that you instead head over to the Privado Platform Overview.
Summary
While most software bugs can be fixed in a subsequent release, once personal data has been shared, it can’t be unshared. Even confidential information like credentials that have been unintentionally shared in cleartext can usually be reset. However, accidentally sharing personal data may have irrevocable consequence—social security numbers are much harder to change than a password.
Static code analysis tools like Privado can significantly reduce the risk of privacy harm by discovering problematic code changes before they’re deployed.
In this tutorial, you’ve had a chance to try it out for yourself by scanning a small sample app written in Java. What will you discover when running it on your own repositories?
Learn more
If you want to learn more about the benefits of privacy code scanning, check out The case for static code analysis for privacy by IAPP.
For a more in-depth look into privacy code scanning, see Privacy code scanning and the Introduction to Privacy Code Scanning e-book.

Comments
Leave a comment by replying to the post on Bluesky or Mastodon.